| The Adventure Begins | |
|---|---|
| |
| Production Information | |
| Original Airdate | August 8, 2000 |
| Ep. Number | Pilot |
| Prod. Code | Pilot |
| Producer(s) | Mark McCorkle Bob Schooley Tad Stones |
| Director(s) | Tad Stones |
| Writer(s) | Bob Roth Bill Motz |
| Studio | Jade Animation International Limited |
| Series Continuity | |
| Previous | N/A |
| Next | The Torque Armada |
| Image Gallery (29) | {{{transcript}}} | |
The Adventure Begins is the pilot episode of Buzz Lightyear of Star Command. It premiered on both DVD and VHS on August 8, 2000, and also aired on ABC as part of Disney's One Saturday Morning programming block. It was later broken up into three televised episodes that were integrated into the actual series.
The DVD and VHS versions feature a short CGI-animated Toy Story introduction by Pixar before the actual film starts, where Andy's toys gather in his room to watch "the new Buzz Lightyear movie". The DVD and VHS versions are also the only versions that feature Tim Allen portraying Buzz Lightyear. The series itself and the three-episode version featured Patrick Warburton as Buzz's voice actor instead.
Synopsis
Evil Emperor Zurg invades the Planet of the Little Green Men and takes control of their Uni-Mind, a mystical orb that enables Star Command's worker LGMs, whose individual minds are useless, to form a combined intellect that keeps the base running. With the Uni-Mind, Zurg seeks to enslave every free mind in the galaxy. Buzz Lightyear is the only one who can stop him along with Mira, Booster and XR, who by the end of the movie join him and become Team Lightyear.
Plot
The Adventure Begins: Part 1
Zeta Quadrant: Uncharted Moon
After having searched half of the Zeta Quadrant and finally ending up on an uncharted moon of an unknown planet, Buzz Lightyear and his partner Warp Darkmatter are still on the lookout for three LGMs who have gone missing from Star Command. While on their search, they discover three stowaway LGMs in their lunar rover who want to help the two Space Rangers find their missing friends. The LGMs are able to think and feel as one through their mindlink and can tell when evil is nearby. Buzz realizes that the
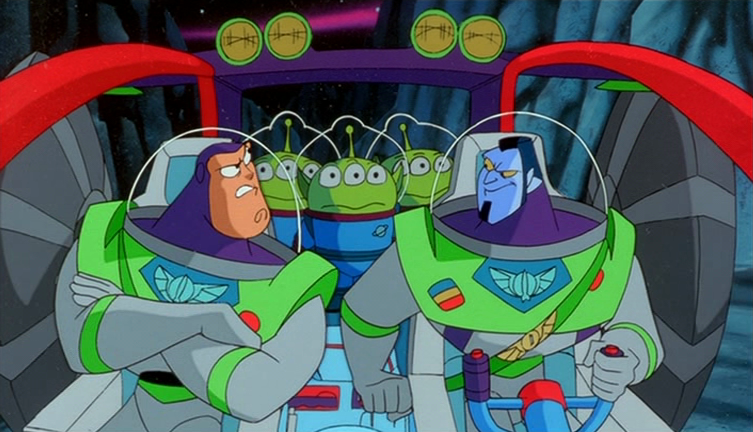

Buzz and Warp with the stowaway LGMs.
one behind the kidnapping must be Zurg, but Warp scoffs that Buzz is always eager to put the blame on the Evil Emperor.
They are then attacked by a crater viper slag monster mutant, and while Buzz and Warp fend it off, the LGMs insist that their friends are nearby. Buzz realizes that the missing LGMs must be underneath the monster, and once he and Warp manage to crush it with a rock, it is revealed that it was sitting atop a trapdoor with the emblem of none other than the Evil Emperor Zurg.
Zurg Subterranean Outpost: Torture Division
Inside the outpost, Brain Pods conduct experiments on the three missing LGMs which have so far only proven what they already knew;
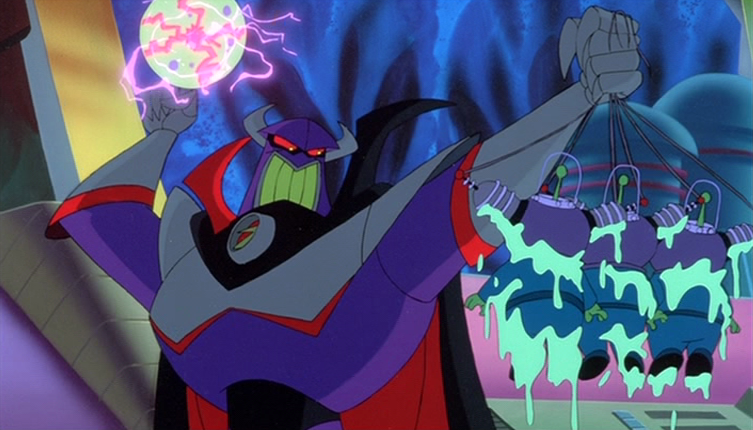

Zurg torturing the LGMs.
that the LGMs think and feel as one. As the minions fret at their poor findings and a Grub keeps going back and forth to deliver messages, Zurg finally makes his appearance. He is less than pleased with the unsatisfactory results of the Brain Pods' experiments and decides to take matters into his own hands, administering his own torture upon the LGMs with a self-generated sphere of electricity. The LGMs insist that they will never talk, but that is exactly what Zurg is counting on and continues to torture them.
Outside, Buzz tries to melt through the door, but it is made out of laser-resistant diabonic alloy. Warp offers to try instead and knocks out the Grub that answers the door with a trick. Inside, the LGMs hurry forwards, eager to find their missing friends. Buzz stops them and orders them back to the ship, but they cry out in mental pain, sensing the torture the other three are enduring. Warp wonders how that is even possible with their mindlink and the LGMs reply that it is due to the Uni-Mind. Buzz explains that all LGMs are connected by this mystical orb that enables all LGMs to feel and think as a collective whole, which is located on their homeworld. After commenting that he ought to be told of these things beforehand, being Buzz's partner, Warp and Buzz continue their search.
Zurg has the LGMs captive, demanding to know their "secret". They continue to resist, and the Evil Emperor decides to use his cranial dissect-a-bot to pick their brains. Buzz destroys the robot at the last second and leaps onto the scene, wrist laser primed and ready, telling Zurg he is under arrest. Zurg threatens to destroy both him and the Galactic Alliance, and summons his robotic army of Hornets to do the job.
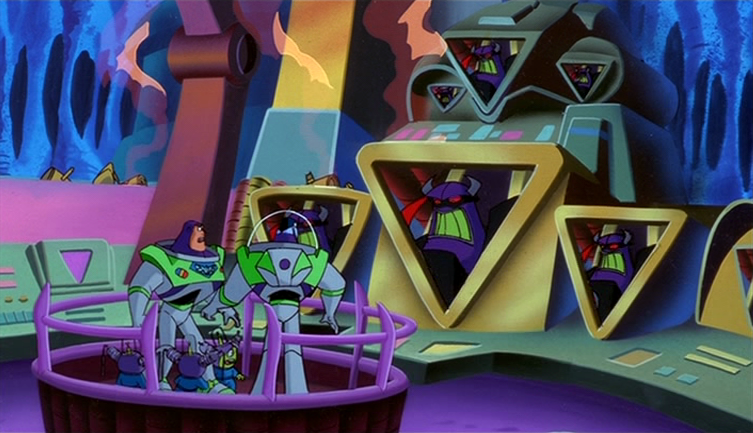

Zurg threatening them about the self-destruct sequence.
As the Hornets surround Buzz and start firing, Zurg makes his escape on an escape platform that had previously been situated above the tube the LGMs had been held captive. Before Buzz can reach him, Zurg has already escaped, so he focuses on freeing the captured LGMs instead. As soon as they're free, Buzz activates his jetpack and tells them to climb on, then flies up, destroying any offending Hornets in the way. Warp appears again and destroys the remaining Hornets by crushing them with the escape platform Zurg had left in before. Buzz immediately wants to go after Zurg, but monitors with the Evil Emperor's face activate around them, and with a cackle he tells them that he activated the self-destruct system on his way out.
Buzz orders the LGMs to escape to the ship while he and Warp fend off more Hornets.


Buzz sees Warp trapped.
The other LGMs herd them away just as the door slides shut behind them. As they fend off the Hornets, one of them falls into a brazier of sorts, causing a premature explosion. The entire chamber erupts into flames, but the explosion causes a pillar to collapse, tearing open a hole in the ceiling for them to escape. However, Warp is trapped underneath the pillar. Buzz tries to free him, but Warp insists that he go without him and activates Buzz's jetpack. Before Buzz can react he is sent flying out of the complex, and before he can fly back in to save Warp, the outpost explodes.
Star Command: After the disastrous mission, all the Space Rangers have gathered to attend Warp's funeral, where Buzz is concluding a eulogy for his late partner and friend, adding at the end that he misses him very much. In his personal log, he later reflects that because of Zurg's obsession to destroy him, Warp was inadvertently caught in the crossfire. Buzz then vows to never take a partner again so as not to risk anyone else dying at Zurg's hands for his sake.
Star Command; Training Deck: Sometime later, we find Commander Nebula at the Training Deck, where Rookies are undergoing a training session. After warning one of them to watch his back and reminding the rest of the lot that they need to be careful on the field, he turns to greet Buzz. Buzz asks Nebula what he summoned him there for, and the Commander simply remarks for him to pay attention as he sets the difficulty to Level 9.
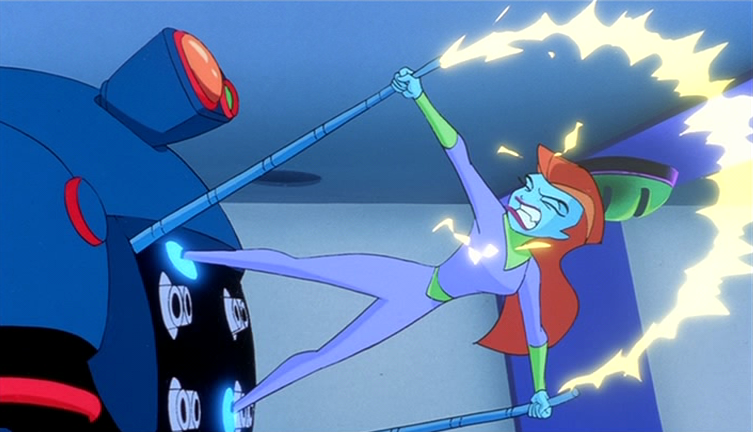
Buzz scoffs and reminds the Commander that he trains on Level 9 and that the Rookies wouldn't be able to handle it. Buzz's prediction rings true as the majority are overwhelmed from the first few seconds in, those who fail being eliminated from the session. Soon, only one Rookie is left. A robot grabs her legs, but she shoots it with her laser to end level 9. Buzz nods in approval, and with a smirk, Nebula cranks it up to Level 10, which startles Buzz. Large robots emerge to face the lone Rookie and surround her. She becomes nervous and overwhelmed as she attempts to fight the robots. The robots fire blobs of a sticky compound at her to trap her in place. Buzz comments that a Rookie wouldn't have been able to make it, but Nebula reminds him that it's not over yet. Though it looks like she has been overwhelmed and she too was thrown out of the game, she emerges from the floor having passed straight 'through', with her hands in fists, having now figured out what to do. She dusts her hands off after similarly phasing through each robot, tearing out their cables and effectively shutting them down.
Buzz wonders how she did that, to which Nebula responds that she is from the planet Tangea. Buzz recalls how Tangeans have mental ghosting abilities that allow them to pass through solid objects. She phases into the control room and salutes, introducing herself as Mira Nova. Buzz frowns, recalling that being the name of the heir to the Tangean

throne and that he had met the princess once, to which Mira quips that he saved her planet once. Nebula properly introduces the two, adding that he has selected Mira to be Buzz's new partner. Buzz immediately refuses, insisting that he now works alone and he can't risk anyone ending suffering the same fate as Warp. Nebula angrily points out that Mira might prevent Buzz from ending up like Warp instead. Despite this argument, Buzz is adamant. Mira adds that he can't go against Zurg alone and that the regulations clearly state that, to which Buzz retorts that he wrote half of them and won't risk anyone getting caught in the crossfire. Nebula barks that he won't let Buzz go out on the field without backup, but Buzz repeats that he works alone and leaves.
Star Command; Star Cruiser Launch Bay: Later on, in the launch bay, a large, red-skinned janitor by the name of Booster sneaks out to see Star Cruisers readied for launch. He is so excited to be there he forgets to clean and he is caught by a security guard,
who reminds him that only authorized personnel are allowed in the launch bay. Booster fears that this will be the end of his career, but Buzz intervenes at the last second. He tells a white lie to the security guard that Booster was only doing his job cleaning the launch bay and the guard, too, dazed that Buzz had intervened, backs off. Once he is gone, Buzz reminds Booster that he can't keep sneaking into the launch bay, and through the following discussion we discover that Booster is trying to become a Space Ranger and has been memorizing the Space Ranger Mission Manual bit by bit for the entrance exam. But before they can say more, Buzz gets a message on his wrist communicator from the LGMs calling him to the science bay..
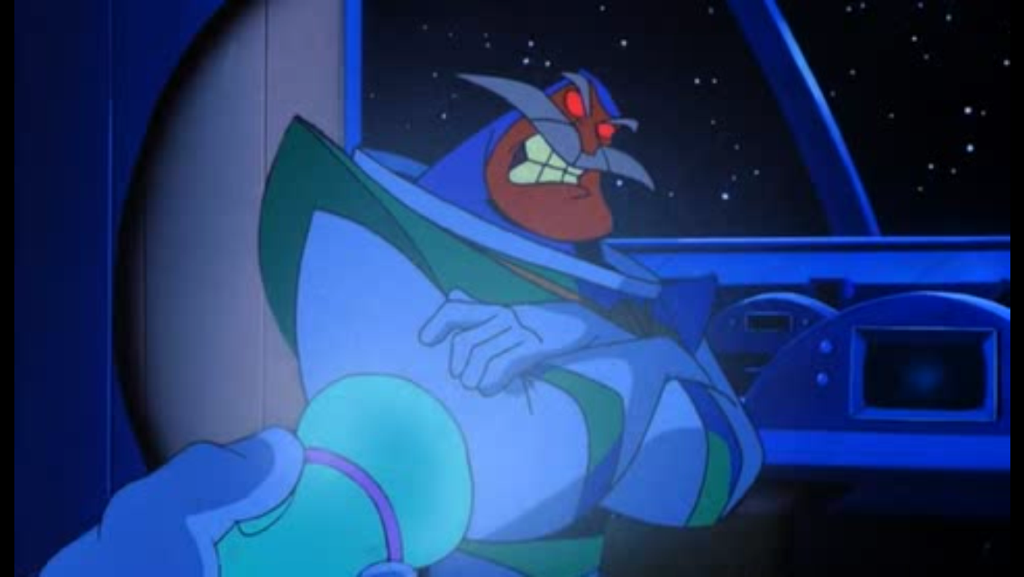
Zurg Tower; A Very Evil Place: On Planet Z, Zurg inquires about the state of his new henchman.
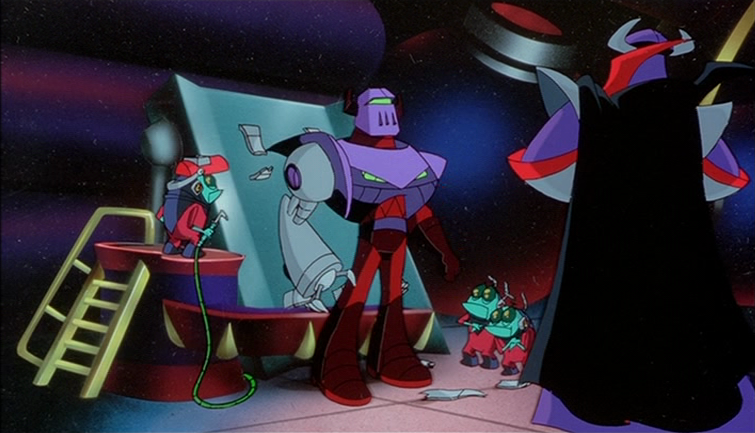
The Brain Pods and Grubs are installing new weapons into the said henchman's artificial right arm, and Zurg reminds them about the necessity of a flamethrower. One Grub tests the limb's reflexes and is fired into a wall. Once everything is in working order Zurg bestows him with a new title; Agent Z. Though the henchman at first rejects it as "stupid", which angers Zurg, the minions caution the new henchman to just go along with it. He quickly accepts it, not wanting to risk Zurg's wrath, and Zurg leads Agent Z to where his spy drone has infiltrated the LGM homeworld in search of the Uni-Mind.
Œzạ£▪◊βGæ!; LGM Homeworld: The LGMs are unaware of Zurg's spy drone watching them as they go about their daily, peaceful lives. One of them plays a fanfare, and hidden compartments revealing stairs emerge everywhere, into which the
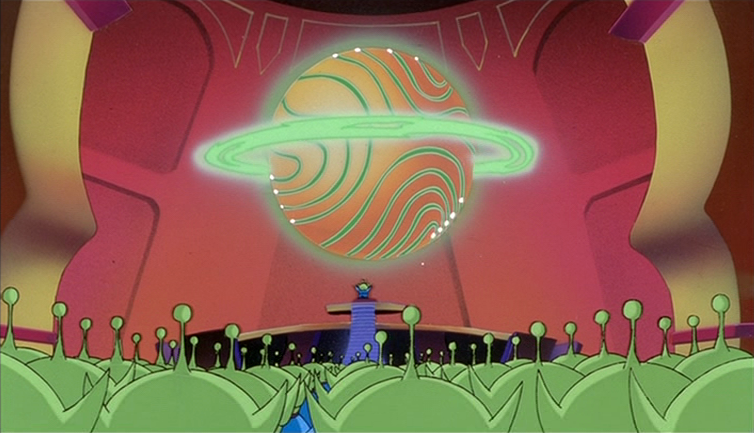
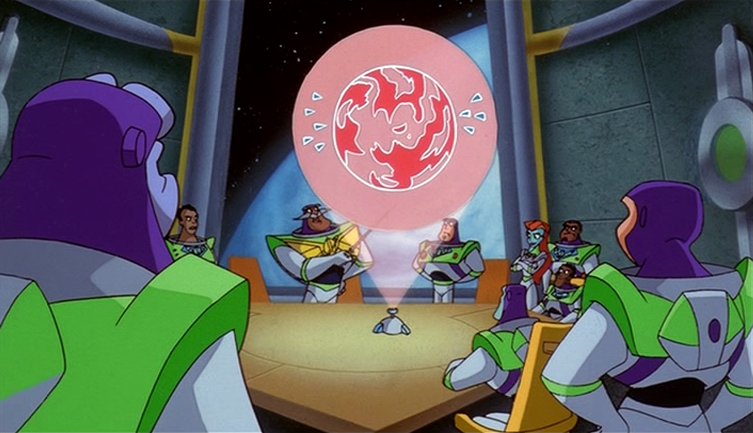
LGMs enter to venture underground. The spy drone, disguising itself as an LGM head and forming itself an inflatable body resembling their suits, follows them underground. All the LGMs have gathered around a platform of sorts and point to the ceiling as it parts to reveal a large claw. As, the claw dips inside the platform and pulls out a large, glowing sphere that almost resembles a small planet, the lead LGM reveals it as the Uni-Mind, which the claw draws out for them. The lead LGM presses his hands upon it, and the orb begins to glow as the LGMs chant in unison, "We are one", their antennae swaying.
Seeing it all on his drone's hidden camera, Zurg is more determined than ever to obtain the Uni-Mind for himself. He orders Agent Z to launch an assault on their planet, to which Agent Z dryly remarks that he'll have the chance to use his flamethrower.
The Adventure Begins: Part 2
Star Command; Science Bay: Back at Star Command, the LGMs have called Buzz to the Science Bay to tell him that they heard about his argument with Nebula and have a solution to his partner problem. Though Buzz begins to refuse, he is curious when the LGMs mention XR. They reveal XR to be a robot and refer to him as an Experimental Ranger. Buzz isn't very impressed by the robot's small build and remarks on how he wouldn't be able to stand a chance against Zurg's forces.

But the LGMs make a point by destroying XR , then rebuilding him again from scratch. They explain that Buzz doesn't have to fear for XR's safety because he can be rebuilt again and again if he ever gets destroyed. Buzz wonders whether Nebula even approved of the construction of a robotic Space Ranger when he hates robots. The LGMs sheepishly admit he doesn't know, but the Commander himself walks in at that point, and he is none too happy about XR's construction. Frustrated when the LGMs admit that he was authorized when they slipped the papers in with their vacation requests, Nebula points out that a robot can't possibly face real dangers like a Space Ranger. The LGMs explain that XR has an artificial intelligence chip and is programmed to watch and learn, and with Buzz at his side, he'll be learning from the best and will be the perfect new partner. Nebula reminds Buzz that Mira is his new partner, but when Buzz once again refuses to have any sort of partner, the LGMs freeze up, their antennae twitching. Through their mindlink they realize that Zurg is invading their homeworld and Buzz immediately sets off to stop him, XR already mimicking him and following close behind.
Œzạ£▪◊βGæ!; Under Attack; Obviously: LGMs flee from attacking Hornets as their world burns around them. They escape to the underground chambers, trying to reach the Uni-Mind to protect it. Joining hands, the tips of their antennae glow and a protective force field surrounds the Uni-Mind. However, an explosion from above causes the ceiling to cave in and the LGMs' protective circle is broken.

Agent Z's ship looms above, and he orders the Hornets to move in. But before the Hornets can take the Uni-Mind, Buzz's wrist laser slices through them. The Hornets attack him and XR, but together they destroy their ranks. Despite that, more Hornets emerge, and Buzz and XR fight against them. Agent Z reports to Zurg that Buzz is there, and Zurg states that he was the reason why Agent Z was sent to capture the Uni-Mind. Agent Z leaves his ship and activates a jetpack and flies down to them, firing. XR and Buzz fire back and Agent Z lifts off again, flying away. Buzz and XR pursue him through a pillar of smoke and lose him, but Agent Z emerges through the smoke from behind them, firing ad flying past them. They fire at him again and the agent attempts to take cover, but they destroy each one. Agent Z flies off again, and Buzz grunts that he's good, firing at him from an angle. The laser ricochets off of several surfaces and hits the agent from the side, and Buzz smirks that he's better. Agent Z takes cover on a rooftop, firing repeatedly at them.

One of the shots knocks XR off, but he climbs back up with a grappling hook, repeating Buzz's phrase. Impressed that the robot is learning, Buzz teaches him another trick. He keeps his wrist laser primed, but carefully removes his glove and leaves it propped up, still firing at the enemy. He begins to scale down the rooftop, telling XR that the enemies never see it coming, but they both freeze in shock when Agent Z appears from behind, having predicted the move. Before Buzz can reach his glove, Agent Z destroys it. And before XR can give Buzz a gun, Agent Z fires a bomb at XR, which destroys him . Agent Z reports to Zurg that the Uni-Mind is all his and Buzz gapes in astonishment to see Zurg's dreadnaught capturing the Uni-Mind. Agent Z fires at Buzz before he can do anything, and Zurg's forces leave the LGM Homeworld with their assault having been a success.
Star Command; Science Bay: Back at Star Command, Buzz has brought the broken remains of XR, to the LGMs and hopes that they can fix him. But without the Uni-Mind they are lost and confused, though they assure him that they will try their best. Though they manage to fix XR's body, they begin to

add a series of unusual objects into his chest compartment. Though in his personal log Buzz reflects that there might be a method to their madness, as the list of unusual items grows longer and longer he is convinced that the LGMs have lost it. Nebula is also stunned and realizes that the LGMs depended heavily on the Uni-Mind, further enhanced when one of them doesn't realize that one of XR's arms is an arm. Nebula fumes, convinced that Zurg stole the Uni-Mind to cripple Star Command, but Buzz disagrees, feeling that there is something more nefarious to Zurg's intentions, for he did not destroy the Uni-Mind, but stole it.
Zurg Tower; New Home of the Uni-Mind: On Planet Z, Zurg is frustrated at his staff and their lack of sufficient results. Brain Pod 13 reports that just as the Uni-Mind connected the LGMs, it could allow Zurg to reach out and ensnare every innocent mind in the Galactic Alliance. The news is insufficient to the Evil Emperor

and only enrages him even further, as he states that he already knows all this since it was his plan from the start and demands to know how close they are to accomplishing it. Brain Pod 13 mumbles something about the first step being to turn the Uni-Mind from good to evil, but they don't know how to do that. Furious, Zurg's red eyes glow and he fires twin laser beams at 13's wheels. Activating his rocket boots, he descends, determined to do it himself. Sinking his claws into the Uni-Mind, Zurg corrupts it with his evil thoughts, and the Uni-Mind turns purple and crackles with electricty, almost seeming to be screaming in mental pain. Once complete, Zurg comments on how proud his mother would have been.
Star Command; Caution: Wet Floor: Back at Star Command, Booster is busy mopping the floor as an announcement goes off for all Space Rangers to gather to the Briefing Room. Space Rangers dash past him and he asks conversationally what's going on. A few say that it's top secret, and Buzz tells Booster it`s for space rangers only before going after them. With a sigh, Booster departs.
Star Command; Briefing Room: Inside, Nebula tells the Rangers about Zurg's capture of the Uni-Mind and Buzz adds that they're launching a full-scale assault on Planet Z. However, that's when a new voice objects at that, and it

turns out to be none other than XR as he rolls in with an all-new attitude. He advises Buzz to listen to what he has to say and suggests that they negotiate with Zurg instead, perhaps splitting the galaxy in half and letting him rule for half of the week while they rule for the other half. Stunned, Nebula asks what in the galaxy happened to XR. The LGMs demur that they fixed him—or so they thought—and Nebula furiously orders them to haul XR out of there. The LGMs do as they say and just so happen to pass by Booster in the hallway. He asks them where they're going with the robot, and the LGMs decide to leave XR with him.
Back in the Briefing Room, Nebula details what each squadron will do. However, Mira speaks up, saying that she's been studying Zurg's planetary defense matrix and believes that a small one-man ship can easily slip past the Evil Emperor's defences.
Buzz agrees and Mira adds that they might be able to undermine Zurg's operation from within. Buzz adds that the new Alpha 1 prototype would be the best ship for the job for him to slip past the defences. Mira objects to Buzz going, saying that it was her idea to go in the first place, but Buzz believes she doesn't have the field experience for such an assignment. Nebula remarks dryly that they should be partners since they're such "pig-headed show-offs", but before they can object properly he cuts in heatedly that the Alpha 1 is still in an experimental stage and that they'll be going with the assault at 0800 hours.
Star Command: B Deck Cafeteria; Avoid the Meatloaf: Booster is using XR to polish the floors of one of Star Command`s dining halls, but XR, however, finds it boring and suggests that they do something more fun instead of work. Booster is shocked and says that he'd never shirk his duty, adding that Buzz would be very disappointed in him. Upon hearing this, XR tells Booster that he used to be Buzz's partner and offers to give him a tour of Buzz's Star Cruiser, to which the young janitor gleefully agrees. Upon Star Cruiser 42, Booster sits in the pilot's seat and pretends to be Buzz, but XR is not as enthusiastic as him and reads a magazine instead.
Zurg Tower; Note: Big Gun on Top: Back on Planet Z, Zurg's minions hasten to set up a large gun on the top of Zurg's tower which they will use to manipulate the Uni-Mind's powers for evil. Zurg dubs it the Zurgatronic Mega Ray and

orders his staff to install the corrupted Uni-Mind inside . Small rockets ease it into place and Zurg`s henchmen load the crystallic fusion cells (which look like large batteries) to operate it. Though Zurg is excited, Agent Z reminds him that he hasn't won until Buzz is out of the picture. Zurg orders the gun to be fired, but it malfunctions due to a short circuit. Zurg turns upon the Grub that fired the gun with eyes aglow, demanding whether the plus and minus parts of the crystallic fusion cell matched the plus and minus parts of the gun. It turned out that the Grub had indeed placed the cell in the wrong position, to which Zurg can merely slap his forehead at.
Star Command; Alpha 1 Hangar; Authorized Personnel Only; I Repeat—Off Limits: In the Launch Bay, Mira ghosts through the walls,

sneaking into the Hangar where the Alpha 1 spacecraft is stored. Once she finds the spacecraft, she attempts to break it, but is stopped by Buzz. He chastizes her for her behavior and orders her to report herself to Commander Nebula. She meekly starts walking away, admitting that she only wanted to help, but pauses, realizing that Buzz himself was not allowed in the hangar either. He tries to tell a cover-up story, but it fails. But before he can think of something else to fool her with, Mira ghosts her hand through Buzz's head in a Tangean brain squeeze, effectively sedating him as she hijacks the Alpha 1.
Mira leaves Star Command for planet Z in the Alpha 1, but the LGMs and Nebula spot her departure from the control center. The Commander demands to know who authorized the flight and Buzz tells him that Mira stole it. Nebula asks whether she beat him to it, to which Buzz grudgingly replies that she did, and Nebula suggests that Buzz go after her in his star cruiser since Mira is his partner and his responsibility. Buzz sets returns to the launch bay for his star cruiser, unknown that Booster and XR are on board. When they hear Buzz coming, they hide, and are inadvertently stuck on board as the Star Cruiser blasts off with Buzz at the controls in pursuit of the Alpha 1.
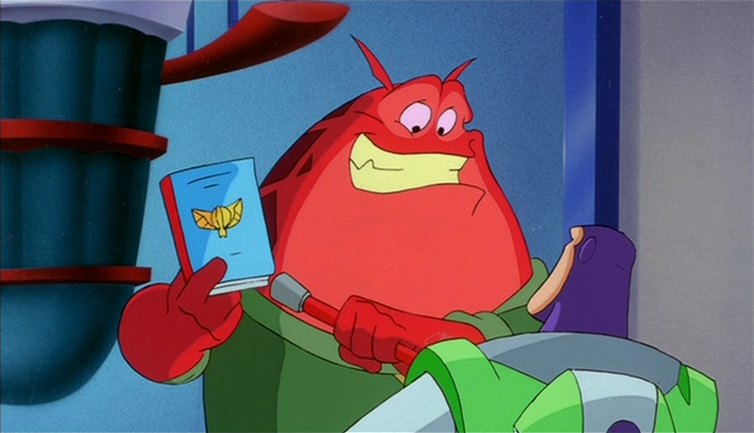
Zurg Tower; Now Zurgarrifically Evil: A Grub reports that the Zurgatronic Mega Ray is online and ready to fire. Zurg decides to test it out before firing at Star Command. Brain Pod 29 suggests they fire at Rhizome and Zurg finds this

a suitable target and asks him how long he's been in his employment. Since he became a brain in a pod it's nearly been four years. Though Zurg wants to drop the conversation, 29 asks him for a cost-of-living raise and that he was promised things when he gave up his body. Zurg grabs his neck cable and says he was only being polite and doesn't care to hear his life story, or anyone else's, and orders them to fire the gun. The gun is sucessfully fired at Rhizome, and the tainted Uni-Mind corrupts the peace-loving Rhizomians.Zurg exclaims that he can feel and control every mind living on the planet and is eager to try it out on another world. 29 suggests Bathyos to test the gun`s underwater effectiveness. The Grub fires at Bathyos and i`s another sucess. Delighted, Zurg spins 29 in a dance. 29 tentatively asks about the raise again, but Zurg scoffs that he won't need them anymore when it'll be "24/7 Zurgie heaven".
Space; Duh: Buzz orders Mira to stop the Alpha 1, but she insists that her plan can work and that she's right, and he knows it too. Buzz regrets that the Commander doesn't agree with them and continues to pursue her through deep space.

He hides his ship in a cloud of space dust, and Mira loses sight of him, but he suddenly flies in front of her, blocking her path. In the meantime, Booster and XR are in the Star Cruiser's locker room. XR finds spare space suits and suggests thatand Booster put one on, jetpack to Star Command, and no one will even know they were gone. But Booster is too large for the space suit. Meanwhile, Buzz fires a magnetic grappling hook that latches onto the Alpha 1. Buzz reels it in, telling Mira to just ease the thrusters out so she doesn't burn them, and Mira grudgingly obeys.
The Adventure Begins: Part 3
Star Cruiser Cargo Bay: Buzz scolds Mira for her recklessness, to which Mira responds shyly about how he is reckless. But then they hear Booster and XR in the locker room and they see that XR is putting Booster in a spacesuit, which shreds due to its size.

Nebula under Zurg's control.
Meanwhile Zurg tells the grubs to fire at Star Command. Just as Buzz is about to fire Booster, the alarm on the ship sounds as the group runs to the cockpit and see the ray headed for the ship. Luclily, Buzz moves the ship out of the way in time. Instead the ray hits Star Command. Buzz tries to communicate with Star Command, but they don't answer. The group goes aboard the station and to find it all dark, even in the control room. Suddenly they hear Zurg's voice coming from the other Space Rangers, LGMs and even Commander Nebula. Zurg tells them that soon the entire Galactic Alliance will be under his control as well. But after he attempts to fire at them, Buzz, Mira, Booster and XR escape from the controlled Space Rangers and LGMs. Mira attempts to fire at them but Buzz stops her from doing it because they are still their fellow Rangers. Booster then gets the idea to get past them by using XR against the controlled space rangers and LGMs. This gives them the chance to get back on board 42 after blocking the door. But they are not safe yet. Zurg chases after them on Star Cruisers and rocket scooters, along with Commander Nebula firing a cannon. Suddenly the controlled Star Command staff retreats. Buzz demands Mira to check what's wrong. She ghosts through the ceiling and finds a bomb on the roof. She gets back inside and warns Buzz, much to XR's and Booster's shock. But Buzz has an idea by saying it's perfect.


The Space Rangers chasing Mira and the gang.
Out in space, Zurg speaks through Nebula that Buzz has haunted him far enough, but no more. As the 42 explodes, they all return to Star Command laughing evilly. Unknown to Zurg, Buzz and the gang have survived by taking the Alpha 1. Buzz says that as long as Zurg thinks he's dead they are given the chance to get to Planet Z.
Zurg Tower.... but you knew that: Back on Planet Z, Agent Z states that he never thought destroying Buzz would be easy. Zurg, still in the belief that Buzz is dead, feels that evil wouldn't be as much fun without his arch-nemesis.
Meanwhile, Buzz is ready to test Mira's theory about a small spacecraft infiltrating Planet Z. Despite Booster's anxiety, Mira tries to assure him that they won't be detected.
Planet Z.... Auto Defense Moon: But the Seeker Drones are on patrol and the lack of space makes it difficult for Buzz to steer clear from them. Suddenly, Booster accidentally sets off the emergency water landing system. At that moment, the crystallic fusion core deactivates and several airbags surround the spacecraft. This makes for a crash landing which dazes Mira, XR and Booster but Buzz is alright.
The Hornets spot the Alpha 1 with the deflated airbags but Brain Pod 13 believes that it's a weather balloon and leads the Hornets away. After that, Buzz and the gang come of hiding and check the Alpha 1, which has little damage.
Buzz then orders Mira, Booster and XR to take the Alpha 1 to find any unaffected planets and evacuate the civilians whilst he goes after Zurg. Despite the team's insistence that Buzz lets them be his back-up, Buzz refuses their help and sends them packing, much to Mira's annoyance.
Just as Zurg is planning out his next target, Buzz makes his attack. Zurg is angry that Buzz survived but Agent Z attacks Buzz. After a short battle, Buzz attempts to arrest Agent Z, who removes his helmet and reveals himself to be Warp Darkmatter, much to Buzz's shock. Warp then knocks Buzz unconscious.
When Buzz regains consciousness, he finds himself on top of Tower Z and Warp reveals he survived the exploding moon and went to work for Zurg full time as many years of working as a double agent. Buzz is shocked and angry by Warp's betrayal just as Zurg arrives and mocks him. Zurg then reveals his plans for Buzz where, instead of killing him, he would possess Buzz with his mind control ray. Buzz then makes a "final log entry", which Warp believes to be unheard by anyone else.
But the "log entry" is transmitted to the Alpha 1 where Mira, Booster and XR hear how Buzz admits he was wrong to take on the mission alone and wishes he had taken on their help. Upon realising that Buzz is calling for help, Mira turns the Alpha 1 back to Planet Z just as Buzz ends his message.
Zurg, unaware of the reinforcements, sends out the orders to target Buzz just as the hornets escort Buzz up to the ray. But, just as the ray is about to fire, long mechanical arms grab Buzz in the nick of time. The arms in question belong to XR who has connected himself magnetically to the Alpha 1, now piloted by Booster. The Hornets managed to break Buzz from XR's grip but Buzz fights them.
Zurg orders Warp to destroy Buzz but a Hornet suddenly knocks off out of the sky. But it turns out that Mira disabled the Hornet and disguised herself using her ghostly powers. Meanwhile, XR falls off the Alpha 1 and Booster dives down to rescue him. Booster then apologises as XR hits himself on the tailfin.
Not willing to be defeated, Zurg tricks Buzz into thinking that "the Planets of the Widows and Orphans" is the next target. Just as Buzz tries to destroy the mind control ray with his laser, Zurg suddenly blasts Buzz's wing and Buzz falls out of the sky. Suddenly, the Alpha 1 crash lands, sending Zurg's henchman. Mira then uses the ejector seat, which sends Booster flying. Booster lands on top of Warp, who feels embarrassed.
Meanwhile, Buzz has survived the fall and he, along with the gang, confronts Zurg and pronounces him under arrest. Suddenly, the Brain Pods fires the ray with a final blast, which enslaves every last planet in the galaxy. Using the distraction, Zurg escapes and tells Buzz that wherever he goes in the universe, he'll hear Zurg's voice mocking him. Buzz is not ready to let Zurg win. He then orders Booster and XR to get up to Zurg Tower and take Warp into custody whilst he and Mira go to take care of the Uni-Mind.
At that moment, the mind control ray malfunctions, setting off a chain reaction and Zurg's henchmen retreat. Warp, who is now handcuffed to a pillar, tells them to come back and release him. But, Booster and XR get there. Then, Booster picks up Warp and XR, Warp panics as he thinks Booster to going to jump. XR states that he and Booster are risk-takers. Then Booster starts running towards the edge as Warp screams in panic. But just as Booster jumps, XR deploys a parachute, which guarantees a safe landing.
Buzz explains to Mira that the LGM's mindlink was activated by a single touch and attempts to restore the Uni-Mind by touching it. But it backfires as thanks to Zurg's touch, the Uni-Mind is now rotten to the core. Mira then decides to send Buzz into the core. The plan works as Buzz's sense of justice and selflessness restores the Uni-Mind and creates a massive burst of energy, which turns Zurg's victims back to normal. Zurg is left angry by this and just as his ship is about to be destroyed, he yells out "Curse you, Buzz Lightyear!" After a moment, Mira goes into the Uni-Mind and rescues Buzz just in time.
After this, the LGMs examine the Uni-Mind and their mindlink is restored, although one of the LGMs briefly thinks he's Buzz. Meanwhile, Warp is placed under arrest. The LGMs admire how XR has gained a humanlink personality. Just as Commander Nebula praises Buzz for saving the day again, Buzz admits he didn't do it alone. Buzz, feeling grateful for Mira, XR and Booster's help, decides to take them on his new partners.
Some time later, everyone is gathered for a reward ceremony where Nebula presents Buzz, Mira, XR and Booster (now in a Space Ranger uniform) with medals and Buzz then announces to the cheering crowd, "Team Lightyear reporting for duty, sir!" The new team then blasts off into space whilst shouting "TO INFINITY AND BEYOND!"
Characters
- Buzz Lightyear
- Warp Darkmatter
- Brain Pod 29
- Brain Pod 13
- Evil Emperor Zurg
- Commander Nebula
- Flarn
- Mira Nova
- Booster
- Corporal
- Agent Z
- XR
- Rocket Crockett (mentioned only)
Quotes
- Buzz Lightyear: Warp, my friend, procedure is what separates us from the wicked forces of chaos.
Warp Darkmatter: Ah, Buzz. If it means less paperwork, I'll take chaos. - Buzz Lightyear: This diabolical plot can only be the work of the sworn enemy of the Galactic Alliance. Evil Emperor Zurg!
[Warp just stares at Buzz for a moment]
Warp Darkmatter: What plot? You think Zurg is behind every kitten stuck up a tree!
Buzz Lightyear: The fiend! Why can't he leave kitty cats out of his nefarious schemes? - Warp Darkmatter: All I know is that we've searched half the Zeta quadrant to find the missing LGMs and what do we find? A lot of nothing!
[A crater viper rears up from a crater directly behind Warp. He sees Buzz's horrified expression.]
Warp Darkmatter: [thumbing over his shoulder] There's something really bad behind me, isn't there? - Warp Darkmatter: [to the LGM he just saved] Any reason you were looking to shake hands with a beast from 20,000 craters?
- Brain Pod 29: [looks up when the doors slide open] Wha—? [sighs in relief upon seeing 13]
Brain Pod 13: Anything?
Brain Pod 29: No.
Brain Pod 13: Oh! He's not going to like this...
[doors slide open again and the minions gasp]
Grub: Anything?
Brain Pod 29: [shakes head] No.
Grub: Oh, he's not going to like this!
[the Grub leaves, but the doors slide open, scaring them again]
Grub: What should I tell him?
Brain Pod 29: We have proven that the Little Green Men think and feel as one. We, heh heh, just don't know how.
Grub: Oh, he's not going to like this at all...
[The Grub leaves, but the doors slide open for a final time.]
Brain Pod 29: Oh, now what!
Grub: [clenched in Zurg's hand] He, uh, he didn't like it... - Warp Darkmatter: Why didn't you tell me?
Buzz Lightyear: Sorry, it was strictly need-to-know classified.
Warp Darkmatter: I'm your partner, I need to know.
Buzz Lightyear: Now you do.
Warp Darkmatter: Anything else I should know?
Buzz Lightyear: No, I'd say you're up to speed.
Warp Darkmatter: Okay, thank you. - Evil Emperor Zurg: Prepare to die, Buzz Lightyear!
Buzz Lightyear: Not today, Zurg! - Commander Nebula: You people try that kind of hot-dogging in the field, and you're space dust!
- Commander Nebula: Look, son, I know you're still torn up about Warp, but next time you're out there—
Buzz Lightyear: And Zurg aims for me? What's to keep the princess from ending up like Warp?
Commander Nebula: Yeah, well, maybe it's the princess keeping you from ending up like Warp!
Mira Nova: Okay, hello? The princess has a name!
Buzz Lightyear: Yeah, I'm sorry, Prince—Mira! I work alone. - Evil Emperor Zurg: A delightful blend of man and machine... with just a naughty touch of lingonberry! I shall call you... Agent Z!
Agent Z: That's stupid.
Evil Emperor Zurg: [eyes flare up in anger] My mother used to call me that!
Brain Pod 29: You know, he really, really likes that name.
Grub: Yes, he's been saving it for one of his most evil henchmen!
Agent Z: [holds up hands as Zurg advances] Agent Z, love it. Especially the whole "Z" thing. - Evil Emperor Zurg: If you want something turned evil, turn it evil yourself. That's what Nana Zurg always used to say, and she was plenty evil.
- Evil Emperor Zurg: Another planet and it's mine! [grabs 29 and spins him around] I'm not the man who knows the man! I am the man!
Brain Pod 29: Um, how about that raise...?
Evil Emperor Zurg: [drops him] Please. Once I enslave the universe, I won't need the likes of you. It'll be all Zurg, all the time! 24/7! Zurgie heaven!
- Commander Nebula: Well, Ranger Nova is your partner; you better go and get her, son.
- Buzz Lightyear: Yes, sir. [runs away but comes back briefly] For the record, she's not my partner, sir.
- Evil Emperor Zurg: And so ends Star Command. [turns to Agent Z] Oh I'm so evil, I just gave myself chills. Even my goosebumps have goosebumps! [laughs] I'm a bad boy! [laughs evilly]
Trivia
- When Warp says "20,000 craters", it's a reference to 20,000 Leagues Under The Sea.
- The claw that pulls up the Uni-mind is similar to the grapple claw in Toy Story.
- The captions on the DVD release incorrectly spell Rhizome as "Rizone", Bathyos as "Batheous", and Brain Pod 13 as "Brain Pod Percy".
- The Rogues' Gallery game on the DVD release incorrectly spells Gravitina's name as "Gravatina".
Bonus Content
The DVD featured bonus content including games.
Rogue's Gallery Game
In this game you must match the clues to the correct villain in their rogues gallery. Once completed, villain profiles would be unlocked.
")
")
")
")
")
")
")
")
")
")
")
Star Command Trivia Game

Digital Comic Book
Under Construction
Errors
- Inside Zurg's Subterranean Outpost, Buzz and Warp's helmets disappear in two scenes.
- The Training Deck scene has several inconsistencies. After level 9 ends, before Mira puts her hand on her hair, she is standing directly underneath the control are of the deck, but when the first robot for level 10 rises up, she is underneath it and to the side. Also, as she is startled when the robot first starts to rise, she is directly in front of the circles on the robot, but in the very next shot, she is standing to their side. When the second robot rises up, she holds her arms up, but in the very next shot, her arms are to the side. She also turns her head around at one point, but in another shot, her head is facing another way. When she rises out of the floor with her hands in fists, the robot in front of her has different colored points on the top of it, which also changes to red when she phases into it. The two circles near the top of one of the robots also change colors when she is standing on it. When one of them falls, it has smoke coming from the top, but when Mira rises out to dust her hands off, the smoke is gone.
- After Buzz says, "Mira, you're with me", his jetpack is intact, yet it is damaged.
- After Agent Z and Zurg stole the Uni-mind, Buzz has his glove back on after taking it off and losing it earlier.
Voice Actors
- Tim Allen as Buzz Lightyear (DVD and VHS release only)
- Diedrich Bader as Warp Darkmatter/Agent Z
- Jennifer Bailey as Rhizomian Woman
- Adam Carolla as Commander Nebula
- Stephen Furst as Booster Munchapper
- Sean P. Hayes as Brain Pod 13
- Charles Kimbrough as Brain Pod 29
- Wayne Knight as Evil Emperor Zurg
- Larry Miller as XR
- Kevin Michael Richardson as Space Ranger
- Nicole Sullivan as Mira Nova
- Patrick Warburton as Buzz Lightyear and LGMs
- Cindy Warden as Technician and Computer Voice
- Frank Welker as Grubs, Cadet Flarn, Self Destruct, Ranger #1, Rhizomian Man
Production Details
Director: Tad Stones
Producers: Mark McCorkle, Bob Schooley, Tad Stones
Screenplay by: Mark McCorkle, Bob Schooley, Bill Motz, Bob Roth
Voice Casting and Dialogue Director: Jamie Thomason
Music by: Adam Berry
Supervising Film Editor: John Royer
Storyboard: Troy Adomitis, Ryan Anthony, Fred Gonzales, Steve Gordon, Wendy Grieb, Greg Guler, Garret Ho, Don MacKinnon, Brad Rader, Chris Rutowski
Timing Directors: Julie Hashiguchi, Gordon Kent, John Kimball, Marsh Lamore
Associate Producer: Mike Karafillis
Production Manager: Larry Johnson
Pixar Creative Consultant: Jeff Pidgeon
Design & Visual Development
Supervising Character Design: Greg Guler
Lead Color Stylist: Sharon Scott
Character Design: Dana Landsberg, Brian Bookshier, Ginny Hawes
Additional Character Design: Kenny Thompkins
Key Location Design: Justin Thompson, Kenny McGill, Simon Rodgers, Latchezar Geuchev
Prop Design: Chuck Puntuvatana, Tom Foxmarnick, Tris Mast
Lead Background Paint: Donna Prince
Key Background Stylists: Tom Cain, Rick Evans, Michael Inman, Sy Thomas
Color Key Stylists: Janet Cummings, Karen Kirkpatrick, Suzette Darling
Animation Production by Jade Animation
Chief Director: Kong, Qing Chang
Jade Animation Studio Producer: Samuel Wong
Directors: Cao, Xu Hua, Li, Jian Jun, Wong, King Fung, Hui, Zheng
Coordinator: Yang, Ping
Model Check Supervisor: Zhao, Bin
Animators: Ren, Cong Rong, Yu, Hai Ying, Du, Jing Mei, Zhang, Yi, Chen, Yong, Chen, Xi Feng, Tang, Wen, Xu, Xiao Ning, Yang, Ping, Xu, Jing, Tu, Hong, He, Ju Yu, Liu, Li Jing, Jin, Xin, Liu, Huang Feng, Ni, Ling, Zhang, Bing, Zhang, Bai Quan, Yu, Min Gnag, Zhong, Zhi Qun, Zhao, Ya Bin, Jiang, Shang, Li, Gang, Dai, Fang Ming, Zhang, Cheng, Ma, Tai, Wu, Zhi Xing, Bian, You Song, Zhuo, Si Nong, Chen, Xiao, Wang, Zheng Yu, Ma, Wen Qi, Lei, Jiang Jun
Inbetween and Ink & Paint Supervisor: Zhang, Jing
Camera Supervisor: Xiao, Wei Wen
Backgrounds
Background Supervisor: Zhang, Yong
Background Artists: He, Bing, Li, Wen Fang, Wang, Hai Hua, Lei, Wnag Jun, Wa, Wei Yuan, Chen, Xi Feng, Zhu, Zhi Shen, Zhang, Min Fang, Hu, Hui
Clean-Up Animation
Clean-Up Supervisor: Zhao, Bin
Clean-Up Artists: Zhang, Wei, Zhuo, Si Nong, Li, Gang, Yang, Yi
Inbetween Animation
Inbetween Supervisor: Zhang, Jing
Character Lead: Che, Jun
Inbetween Artists: Bian, You Shong, Zhang, Gang, Hu, Peng Yuan, Leng, Jun Lu, Deng, Wei Zhi, Liu, Ping, Xu, Ran, Wang, Jian, Wang, Hong Dong, Xu, Qiang, Li, Zhong Wei, Li, Si Cong, Zhang, Yi Zhe, Wang, Yun Dong, Bian, You Jun, Zhu, Wei Pang, Sun, Yang, Qiu, Yu
Inbetween Check: Jiang, Hui Mei, Luo Yu Qiong, Chen, Yi, Zhu, Jian Bo, Luo Jing, Zhang, Jun, Lu, Chang Li, Wan, Ting Tan, Yan, Yen, Fang, Wu Fei, Chen, Yu Fei
Character and Background Layout by Walt Disney Animation Japan
Layout Director: Masaki Sugiyama
Layout Supervisor: Kazuyoshi Takeuchi
Lead Artists: Hiroshi Kawamata, Takeshi Atomura, Kazuhiro Ohmama, Shigeru Yamamoto, Kenichi Tsuchiya, Hirofumi Nakata, Junpei Tatenaka
Layout Artists: Kiyomi Miyakawa, Isamitsu Kashima, Yoshiharu Ashino, Takayo Nishimura, Atsuhiko Hara, Yoshiharu Sato, Manabu Kawada, Hiroko Minowa, Chie Arai, Sachiko Wakabayashi, Kazuhiro Murase, Atsushi Sekiguchi, Genta Chiba, Kazuko Shibata, Nozomi Fujii, Yuji Watanabe, Ikuko Shimada, Rie Arai, Koji Ukai, Takeo Shuto, Tomokatsu Nagasaku
Production Assistants: Takanki Matsudaira, Yukari Kiso
CGI Main Title: Pixar Animation Studios
Digital Production
Effects Supervisor: Madoka Yasuet
Digital Effects: Kousuke Arakawa
Digital Effects Backgrounds: Hiroshi Ohno
Production
Production Coordinator: Jessika Portillo
Production Associate: Carrie Cobrae
Continuity Checkers: Kathrin Victor, Jungja Kim-Wolf
Storyboard Revisions: Fred Gonzales, Tory Adomitis
Production Accountant: Ron J. Earhart
Talent Manager: David H. Wright III
Talent Coordinator: Lisa Schaffer
Manager, Script Department: Anita Lish
Script Coordinator: Dawn T. Connors
Production Secretaries: Linda DeLizza-Kweens, Jessica Farley
Technical Directors: Darren Clark, Brian Cole, Andrew Schoentag
Post Production
Post Production Supervision: Mark Von Der Heide, Steven J. Arenas
First Assistant Film Editor: Jennifer Harrison
Post Production Coordinators: Craig Sawczuk, Mark Allen Bellinger
Track Reader: Skip Craig
Sound
Sound Designer: Paca Thomas
Dialogue Editor: Robbi Smith
Music Editor: Marc S. Perlman, M.P.S.E.
Foley Artist: Diane Parrino
Foley Recordist: Marilyn Graf
Digital Audio Transfer: J. Lampinen
Supervising Re-Recording Mixer: James Hodson
Re-Recording Mixers: Melissa Ellis, Fil Brown
Original Dialogue Recording: Paul Andris
Assistant Dialogue Engineer: Lisa Carlon
ADR Engineer: Ernie Sheesley
ADR Coordinator: Christina Cornejo
Original Dialogue Editor: Regina Prosi
Title Design: Susan Bradley
Titles & Opticals: Buena Vista Imaging
Color Timing: Mitch Drickman
Negative Cutting: Mary Beth Smith
Music
Additional Music by: Andrew Gross, Jake Jacobson, Christopher Lennertz
Orchestrations by: Adam Berry, Andrew Gross, Jake Jacobson, Christopher Lennertz
Score Conducted by: Jerry Grant
Music Mixer: Casey Stone
Supervising Music Editor: Dominick Certo
Music Contractor: Reggie Wilson
Supervising Copyist: Booker White
End Title Song
"To Infinity and Beyond" Words and Music by: Fred LaBour (Wonderland Music Company, Inc. (BMI))
Arranged by: Randy Petersen and Tim Heintz
Performed by: William Shatner and The Star Command Chorus
Animation Production by: Jade Animation International Limited, Walt Disney Animation (Japan), Inc.
Produced By: Walt Disney Television Animation